Showing posts with label Java Fundamentals. Show all posts

Thursday, February 16, 2012

Runtime and checked exceptions

Java packages contain Exception subclasses that describe exceptions that are specific to each package. Each subclass of Exception represents a particular exception type.
The RuntimeException class - a subclass of Exception - and its subclasses describe exception objects that are thrown automatically by the Java Virtual Machine (JVM) at runtime.

Runtime exceptions are generally caused by bugs in the source code. For instance, you need to ensure that a divisor is not equal to zero before dividing by it.
The RuntimeException subclass contains various subclasses. These include
  • ArithmeticException
  • IndexOutOfBoundsException
  • IllegalStateException
  • NegativeArraySizeException
ArithmeticException
When a program tries to do something that breaks the rules of arithmetic, an ArithmeticException is thrown. For example, if a method tries to divide an integer by zero, the method throws an instance of this class.
IndexOutOfBoundsException
When an index to a string or an array is out of range, an IndexOutOfBoundsException is thrown. For example, trying to access the twelfth element of a ten element array will throw this exception.
IllegalStateException
When a method has been invoked illegally an IllegalStateException is thrown. In other words it was not in the correct state to be called at the time.
NegativeArraySizeException
If an application tries to create an array that has negative size, a NegativeArraySizeException is thrown. An array must have zero or more elements.
You can catch RuntimeException types by using try-catch blocks.
Code that might trigger a runtime exception, but that does not contain try-catch blocks, will still compile. All exceptions deriving from RuntimeException are known as unchecked exceptions. This means that the compiler does not check whether they are handled or declared.
All the classes that inherit from Exception and are not RuntimeException subclasses are known as checked exception classes.
When checked exceptions might occur in a method, they must either be declared in the method declaration using a throws clause, or explicitly handled in the method body. Otherwise, the code will not compile.

An example of a situation that can cause a checked exception is when a method attempts to open a file that cannot be opened.

You use a try-catch statement to handle checked exceptions that are raised.
Checked exception classes include
  • ClassNotFoundException
  • InterruptedException
  • IllegalAccessException
  • FileNotFoundException
ClassNotFoundException
ClassNotFoundException is thrown when a program tries to load a class using its name, but the definition for the class with the specified name is not found. These exceptions occur when a program uses the forName method in the Class class or the findSystemClass or loadClass method of the ClassLoader class.
InterruptedException
When a thread has been inactive for a long time and another thread uses the interrupt method in the Thread class to interrupt it, an InterruptedException is thrown.
IllegalAccessException
When the currently executing method does not have access to the definition of a field the application is trying to get or set, an IllegalAccessException is thrown. This also applies if the method doesn't have access to the definition of a method the application is trying to invoke.
FileNotFoundException
FileNotFoundException, which belongs to the java.io package, is thrown when an application fails to open a file specified by a pathname. This can happen if the file is inaccessible, or if it doesn't exist.

The Throwable class

All Java exceptions and errors are subclasses of a class in the java.lang package called Throwable. Only an object of type Throwable can be thrown in code, including exceptions and system errors.
Methods of the Throwable class include
  • getMessage
  • toString
  • initCause
  • printStackTrace
getMessage
The getMessage method returns an appropriate String error message from a Throwable object.

The getMessage method returns null if the object was not created with an error message. You should provide descriptive messages for all exceptions handled in code.
toString
The toString method returns a description of an exception object, which includes the exception type.
initCause
The initCause method sets the cause of the exception, which is always another Throwable object. This method enables exception chaining.
printStackTrace
You use the printStackTrace method to find out which method has thrown a particular exception.
Suppose you want to print out the call stack at the point that e is caught.
public class TestExceptions2 {

  // Catch the exceptions within the method itself
  void tryValues (int x, int y) {

    boolean wasError = false ;
    int[] intArray = new int[5] ;
    for (int i=0; i < intArray.length - 1; i++ ) 
      { intArray[i] = i + 8 ; }
    try {
      for (int i = 0; i <= x - 1; i++) {
        System.out.println (intArray[i] / y) ;
      }
    }
    catch (ArrayIndexOutOfBoundsException e) {
      System.out.println ("Array bounds exceeded" ) ;
      MISSING CODE();
      wasError = true ;
    }
  }
}
To print out the call stack, you type e.printStackTrace.
The call stack records the series of method calls leading to the exception. When debugging, you can use printStackTrace to help determine where the exception originated in your code.
public class TestExceptions2 {

  // Catch the exceptions within the method itself
  void tryValues (int x, int y) {

    boolean wasError = false ;
    int[] intArray = new int[5] ;
    for (int i=0; i < intArray.length - 1; i++ ) 
      { intArray[i] = i + 8 ; }
    try {
      for (int i = 0; i <= x - 1; i++) {
        System.out.println (intArray[i] / y) ;
      }
    }
    catch (ArrayIndexOutOfBoundsException e) {
      System.out.println ("Array bounds exceeded" ) ;
      e.printStackTrace();
      wasError = true ;
    }
  }
}
The two immediate subclasses of Throwable are
  • Error
  • Exception
Error
Error and its subclasses are used for serious system or compile-time errors that cannot or should not be handled by an application. For instance these could include the following errors - ExceptionInInitializerError, StackOverflowError, and NoClassDefFoundError.
Exception
Exception and its subclasses are used for implementation-specific exceptions that an application might be expected to handle - for example, if a printer is switched off when the user attempts to print a document.

Exception is the superclass of all the exceptions you can handle in your code.

Wednesday, February 15, 2012

Using try, catch, and finally blocks

Java's exception-handling code is specified within a try...catch...finally block.


The try block encloses the code that might cause an exception to occur. The code in the try block is called protected code.
// basic try statement syntax
try {
  // protected code
}
catch (ExceptionType1 Identifier1) {
  // exception-handling code
}
catch (ExceptionType2 Identifier2) {
  // exception-handling code
}

finally {
  // 0 or 1 finally clause
}
You use zero or more catch blocks. When present, catch blocks specify exception handlers for the types of exceptions thrown. If no exception is thrown, then the code in the catch block doesn't run because it isn't needed.
The finally block is optional if a try block already has an associated catch block. If you have a finally block, the code it contains always executes, regardless of whether exceptions are thrown or not. The only exception to this rule is if a System.exit occurs, in which case the application terminates without executing a finally block.
If an exception occurs in a try block and is not caught in a catch block, a finally block will execute, provided it is present. The application then terminates.

If required, you must explicitly throw the exception up the call stack. If no method handles the exception, the program terminates when the exception object reaches the top of the call stack.
Consider the code in which the tryValues method contains appropriate exception-handling code.

The method takes two parameters – x and y. It declares and initializes an array and then prints the value of each array element divided by y, within a loop.
public class TestExceptions {

  // Catch the exceptions within the method itself
  void tryValues (int x, int y) {

    boolean wasError = false ;
    int[] intArray = new int[5] ;
    for (int i=0; i < intArray.length - 1; i++ )
      { intArray[i] = i + 8 ; }
    try {
      for (int i = 0; i <= x - 1; i++) {
        System.out.println (intArray[i] / y) ;
      }
    }
    //...
You enclose any lines of code that could cause exceptions in a try block.

For example, an exception could be caused if x is larger than the size of the array, or y is equal to zero.
public class TestExceptions {

  // Catch the exceptions within the method itself
  void tryValues (int x, int y) {

    boolean wasError = false ;
    int[] intArray = new int[5] ;
    for (int i=0; i < intArray.length - 1; i++ )
      { intArray[i] = i + 8 ; }
    try {
      for (int i = 0; i <= x - 1; i++) {
        System.out.println (intArray[i] / y) ;
      }
    }
    //...
If an exception occurs in a try block, execution is immediately directed to a series of catch blocks following the try block, which include the error-handling code.

Generally, you include a catch block for each type of exception that might be thrown in the try block, although you can write a single catch block for all exceptions if you like. You should aim to catch and handle specific exceptions, rather than general ones.
try {
  for (int i = 0; i <= x - 1; i++) {
    System.out.println (intArray[i] / y) ;
  }
}
catch (ArrayIndexOutOfBoundsException e) {
  System.out.println ("Array bounds exceeded" ) ;
  wasError = true ;
}
catch (ArithmeticException e) {
  System.out.println ("Attempt to divide by zero" ) ;
  wasError = true ;
}
catch (Exception e) {
  System.out.println ("Unknown exception occurred: " + e) ;
  wasError = true ;
}
finally {
  if (wasError)
    System.out.println ("Ending tryValues with error" ) ;
  else
    System.out.println ("Ending tryValues without an error" ) ;
}
If an exception occurs, the catch blocks are checked in order, from top to bottom.

If the exception is of the appropriate type for one of the catch blocks, the statements within the catch block are executed and no further catch blocks are checked. So the order in which you position catch blocks is important.

Introducing exception handling

In programming terms, an exception is an event that stops the normal execution of a program.

For example, a program might try to access an element outside the bounds of an array, or some file input and output operation might fail.

You need to ensure that your Java programs can deal with exceptions without simply crashing.
When an exception occurs at run time, the method in which it occurs creates an exception object. Execution is aborted unless the exception is handled somewhere along the call stack.

The method can throw the exception back to the calling method, which may be better able to handle it. The exception object includes information about the exception, such as the method in which it occurred and the cause of the exception.
The calling method can, in turn, throw the exception back to its caller. It's up to the developer to provide exception-handling code within the appropriate methods.
If no method handles the exception, the program terminates when the exception object reaches the top of the visible call stack - the main method.
When an exception occurs, you can prevent it being passed up the call stack – and potentially terminating the application – by providing handling code for the particular exception type, enabling the application to continue execution along a different path.

You can direct an application to use an exception handler in the method in which the exception occurs, or in one of that method's calling methods.
Once the exception is handled, the program continues to run, although this depends on the specific implementation.

Monday, February 13, 2012

New methods of the File class

In Java SE 6.0, the File class has been enhanced to include new methods that provide information about disk usage:

  • getTotalSpace()
  • getFreeSpace()
  • getUsableSpace()
getTotalSpace()
The getTotalSpace method provides information on a particular File's partition size in bytes.
getFreeSpace()
The getFreeSpace method provides information about the available space still unused in a particular File partition in bytes.
getUsableSpace()
Similar to getFreeSpace, the getUsableSpace method further checks for OS restrictions and available write permissions associated with the File.
This code is an example of how to use the getTotalSpace, getFreeSpace, and getUsableSpace methods.
import java.io.*;

public class SampleFileMethod {
  public static void main(String args[]) {

       if(args.length>0) {
    File f=new File(args[0]);
    System.out.println(" Total size of " + f + " is=:"+ f.getTotalSpace());
    System.out.println(" Available space of " + f + " is=:"+ f.getFreeSpace());
    System.out.println(" Usable space of " + f + " is=:"+ f.getUsableSpace());
      } else {
    System.out.println(" Enter a Filename");
    }
  }
}
Additional methods used to specify restrictions or permissions in reading, writing, or executing a File object are
  • setWritable()
  • setReadable()
  • setExecutable():
setWritable()
The setWritable method specifies the permissions on write operations to a File object. This method is overloaded as follows:
  setWritable(boolean writable)
  setWritable(boolean writable, boolean ownerOnly)

The first method is used to specify if the file is writable or not. The second method enhances the first by specifying if the write permission is applicable only to the owner.
setReadable()
The setReadable method specifies the permissions on read operations to a File object. This method is overloaded as follows:
  setReadable(boolean readable)
  setReadable(boolean readable, boolean ownerOnly)
The first method specifies if the file can be accessed or not. The second method enhances the first by specifying if the read permission is applicable only to the owner.

If the underlying file system cannot distinguish the owner's read permission from that of others, the permission will apply to everybody, regardless of this value.
setExecutable():
The setExecutable method specifies the execute permissions on a File object being executed. This method is overloaded as follows:
  setExecutable(boolean executable)
  setExecutable(boolean executable, boolean ownerOnly)


The method used to test if the file can be executed or not is the canExecute() method.
This code is an example of how setWritable() can be used.
import java.io.*;

public class SampleFileWrite {

  public static void main(String args[]) {
       if(args.length>0) {
    File f=new File(args[0]);
    f.setWritable(false);
    System.out.println("File writable? " + f.canWrite());
    //checks if the File is editable
    f.setWritable(true, true);
    System.out.println("File writable? " + f.canWrite());
    //checks if the File is editable
      } else {
    System.out.println(" Enter a Filename");
    }
  }
}
The canWrite method is used to check whether the file can be edited or is read only (where setWritable() is set to false).

Console Class

The Console class is a new feature of Java 6.0. It provides an alternative to the standard streams currently being used.


The Console is commonly used as a support in securing password entries. It contains methods that can suppress the characters being displayed on the user's screen, and remove them from memory when they are no longer needed.
To use the Console, you must retrieve the Console object using the System.console method. If the Console object is available, the Console object is returned. Otherwise, it returns null, and use of the Console is not permitted. This happens when the Console is not supported by the underlying OS or the application is launched in an environment that is not interactive.
Consider this sample code that uses the Console class to verify a password.

The first statement executed within the static main method attempts to retrieve an instance of the Console object using System.console().
import java.util.Arrays ;
import java.io.* ;
public class SampleConsole {
    
    public static void main (String args[]) throws IOException {

        Console c = System.console() ;
        if (c == null) {
            System.err.println("No console is available.") ;
            System.exit(1) ;
        }

        String login = c.readLine("Please enter your login information: ") ;
        char [] oldPassword = c.readPassword("Enter your old password: ") ;
      boolean test ;
        
            do {
                char [] newPassword1 =
                    c.readPassword("Input your new password: ") ;
                char [] newPassword2 =
                    c.readPassword("Input the new password again: ") ;
                test = ! Arrays.equals(newPassword1, newPassword2) ;
                if (test) {
                    c.format("Your passwords do not match. Try again.%n") ;
                } else {
                    c.format("The password for %s changed.%n", login) ;
                }
                
            } while (test) ;        
  }  
}
If the Console object is not available, the application is aborted using the System.exit(1) method.

If a Console object is available, the readLine method is invoked to prompt for and read the user's login name.
The readPassword method is invoked to prompt and read the password. Values typed are not echoed on screen. This provides a secure entry of values being typed for a password.
import java.util.Arrays ;
import java.io.* ;
public class SampleConsole {
    
    public static void main (String args[]) throws IOException {

        Console c = System.console() ;
        if (c == null) {
            System.err.println("No console is available.") ;
            System.exit(1) ;
        }

        String login = c.readLine("Please enter your login information: ") ;
        char [] oldPassword = c.readPassword("Enter your old password: ") ;
      boolean test ;
        
            do {
                char [] newPassword1 =
                    c.readPassword("Input your new password: ") ;
                char [] newPassword2 =
                    c.readPassword("Input the new password again: ") ;
                test = ! Arrays.equals(newPassword1, newPassword2) ;
                if (test) {
                    c.format("Your passwords do not match. Try again.%n") ;
                } else {
                    c.format("The password for %s changed.%n", login) ;
                }
                
            } while (test) ;        
  }  
}
The Arrays.equals method is used to test the two character arrays. If they contain the same values, the Arrays.equals method will return a boolean value.
The format method writes output to the console's outputstream using the specified format. It is similar to a printf method because it enables more control over how the output should display.
import java.util.Arrays ;
import java.io.* ;
public class SampleConsole {
    
    public static void main (String args[]) throws IOException {

        Console c = System.console() ;
        if (c == null) {
            System.err.println("No console is available.") ;
            System.exit(1) ;
        }

        String login = c.readLine("Please enter your login information: ") ;
        char [] oldPassword = c.readPassword("Enter your old password: ") ;
      boolean test ;
        
            do {
                char [] newPassword1 =
                    c.readPassword("Input your new password: ") ;
                char [] newPassword2 =
                    c.readPassword("Input the new password again: ") ;
                test = ! Arrays.equals(newPassword1, newPassword2) ;
                if (test) {
                    c.format("Your passwords do not match. Try again.%n") ;
                } else {
                    c.format("The password for %s changed.%n", login) ;
                }
                
            } while (test) ;        
  }  
}
The %s coversion type format is used to represent a value as a String. The login varaible represents the value that is being formatted by %s and the %n conversion type format is equivalent to a carriage return.

Reader and Writer classes

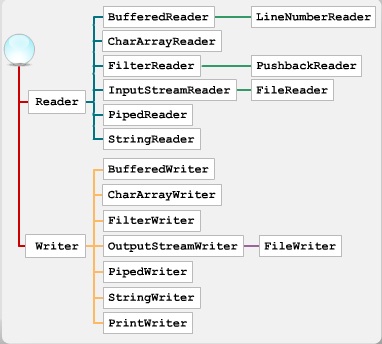
Reader classes are similar to input streams, and writer classes are similar to output streams. Reader classes descend from the abstract Reader class, whereas the Writer classes descend from the abstract Writer class.


Both readers and writers are divided into low-level and high-level classes. Low-level classes communicate with I/O devices, and high-level classes communicate with the low-level ones.
Readers and writers are designed specifically for Unicode characters. Low-level readers and writers deal with chars.
The java.io package provides the following low-level Reader classes:
  • FileReader
  • CharArrayReader
  • PipedReader
  • StringReader
FileReader
The FileReader class is used to read streams of characters from a file.

This class is useful to read text files.
CharArrayReader
The CharArrayReader class reads arrays of characters by implementing a character buffer. The character array acts like a character input stream.
PipedReader
The PipedReader class provides a piped character-input stream.

It should be used with a piped character-output stream so that data written to the PipedWriter will be available from this reader.
StringReader
The StringReader class uses strings as its source of a character stream. Individual characters can be marked and read from the string.
The high-level reader classes include
  • BufferedReader
  • FilterReader
  • InputStreamReader
BufferedReader
The BufferedReader class is used to read text from a character-input stream.

You can use the class to improve the efficiency of your code. Buffers enable you to write and read data in bulk. It is recommended to always use buffered I/O.
FilterReader
The FilterReader class is an abstract class that is used to filter character streams. By overriding the appropriate methods of FilterReader, a subclass can decide what gets read and how it is handled. For example, you can filter lines from a file, based on a regular expression.
InputStreamReader
The InputStreamReader is a class that is used to convert a byte stream into a set of characters, using a specified Charset. You can use InputStreamReader to accept input from System.In, up to a designated escape character or sequence.
Consider the code for the InnerActionListener class. The FileReader class, which the application uses to read data, has two constructors. One constructor takes a File object as a parameter.
class InnerActionListener
  implements ActionListener {
  public void actionPerformed (ActionEvent e) {
    String s ;
    long len ;
    contents.setText(null) ;
    File f = new File (tb.getText().trim()) ;
    if (f.exists() && f.isFile()
    && f.canRead()) {
      try {
        FileReader buff = new FileReader (f) ;
        BufferedReader theFile = 
        new BufferedReader(buff) ;
        while ((s = theFile.readLine()) != null) {
          contents.append (s + "\n") 
        }
        target.setText(tb.getText().trim()+"2") ;
        theFile.close() ;
FileReader(String pathname)
FileReader(File file)
The application first creates a File object. The File object allows you to interrogate the file system.
The file object is passed into the constructor for a FileReader called buff. The FileReader is a low-level object that allows you to read from a file.
BufferedReader - one of the high-level readers in the java.io package - has an internal buffer that enables data to be read in large blocks. This reduces I/O overhead.
class InnerActionListener
  implements ActionListener {
  public void actionPerformed (ActionEvent e) {
    String s ;
    long len ;
    contents.setText(null);
    File f = new File (tb.getText().trim()) ;
    if (f.exists() && f.isFile()
    && f.canRead()) {
      try {
        FileReader buff = new FileReader (f) ;
        BufferedReader theFile = 
        new BufferedReader(buff);
        while ((s = theFile.readLine()) != null) {
          contents.append (s + "\n") ;
        }
        target.setText(tb.getText().trim()+"2") ;
        theFile.close();
Its readLine method can read the next line of text sent to it by a low-level reader.
String readLine() throws IOException
It is a good idea to wrap buffered readers around unbuffered readers to make I/O more efficient.
A BufferedReader object can accept any type of low-level reader as an input source. For example, you can specify that the buff FileReader object is used as an input source by passing it into the constructor of the BufferedReader class as a parameter.
class InnerActionListener
  implements ActionListener {
  public void actionPerformed (ActionEvent e) {
    String s ;
    long len ;
    contents.setText(null);
    File f = new File (tb.getText().trim()) ;
    if (f.exists() && f.isFile()
    && f.canRead()) {
      try {
        FileReader buff = new FileReader (f) ;
        BufferedReader theFile = 
        new BufferedReader(buff) ;
        while ((s = theFile.readLine()) != null) {
          contents.append (s + "\n") ;
        }
        target.setText(tb.getText().trim()+"2") ;
        theFile.close() ;
You can use a while loop to read the next line from the specified file and display it in the application's contents area.
As with input and output streams, most reader classes have a corresponding writer class. In this example, an application uses a FileReader and a BufferedReader to read files. It uses a FileWriter and a BufferedWriter to write them.
class innerButtonListener extends MouseAdapter{
  public void mouseClicked(MouseEvent evt) {
  File f = new File(target.getText().trim());
    Button b2;
    if(f.exists()) {
      enter.setText("This file already exists");
      return;
    }
  try{
    FileWriter output = new FileWriter(f);
    BufferedWriter out =
    new BufferedWriter(output);
    String s = contents.getText();
    //write out contents of TextArea
    out.write(s,0,s.length());
    //send output from write to file
    out.flush();
    out.close();
    //close files
    output.close();
  }
The write method of BufferedWriter writes the data from the application's contents area.
But it does not write data to its destination if the amount of data is smaller than the BufferedWriter object's buffer. If that is the case, the object stores the data instead of writing it to the file. When the buffer's size limit is reached, the object writes the contents of the object's buffer to the file.
To prevent this data being lost when you close the file, you use the flush method to send all the remaining data from the BufferedWriter object's buffer to the FileWriter object.
Exception errors often occur when executing an application that uses the input and output classes. These can be thrown by the JVM. Some important errors include
  • FileNotFoundException
  • EOFException
  • InterruptedIOException
  • ObjectStreamException
FileNotFoundException
A FileNotFoundException occurs when an attempt to locate a file at a specified path is unsuccessful.
EOFException
An EOFException occurs when the end of a file is reached unexpectedly.
InterruptedIOException
An InterruptedIOException occurs when the input or output operation is interrupted unexpectedly.
ObjectStreamException
The ObjectStreamException class is the base class for errors thrown by the ObjectStream classes.

High-level streams

High-level input and output streams communicate with low-level streams rather than with I/O devices. You can use them for high-level input and output.

Most of Java's high-level input and output classes inherit attributes from the FilterInputStream and FilterOutputStream superclasses. In turn, these classes inherit from the abstract InputStream and OutputStream classes.
Suppose you are using a DataInputStream constructor for one of these classes. You need to pass an InputStream to the constructor as a parameter.
DataInputStream(InputStream objectName)
You can use any class that inherits from the InputStream class as an input source for a high-level stream. For example, you can use a FileInputStream object that you have already created, or use input from a socket or pipe.
When a high-level stream object, such as an instance of the DataInputStream class, receives byte input from a low-level stream, it processes the bytes and converts them into the appropriate datatype.

The DataInputStream class contains read methods that convert bytes into all the primitive datatypes, as well as into UTF strings. For example, the readInt method reads the next four bytes and converts them into an int. For the methods to work correctly, these four bytes must represent an int. You need to make sure that the data is read in the same order in which it is written to a stream.
To close a DataInputStream object, you use the class's close method.

If you need to close a chain of stream objects, you do so in reverse order so that the object that was created first is the last one to close.

This prevents you from closing an InputStream before you close the high-level stream that uses it as an input source.
For example, the code sample that reads sales data from a file uses the close method to close an instance of the DataInputStream object.
    for (int i = 0; i < descs.length; i ++) {
      myData = new SalesData (descs[i], amounts[i], values[i]);
      writeSalesData ( myData ) ;
    }
    out.close() ;


    // Prepare to read it in
    in = new DataInputStream(new FileInputStream(fruitfile)) ;

    for (int i=0; i<6; i++) {
      myData = readSalesData () ;
      System.out.println("You sold " +
      myData.desc + " at $" +
      myData.value + " each. Amount was " + myData.amount) ;
    }
    in.close() ;
  }

The subclasses of the FilterOutputStream class include
  • DataOutputStream
  • BufferedOutputStream
  • PrintStream
DataOutputStream
You use the DataOutputStream to write data to a stream by passing an OutputStream to a DataOutputStream object as a parameter when you create the object.
BufferedOutputStream
You use the BufferedOutputStream to write data to a buffer. This in turn writes it to the underlying stream.
PrintStream
A PrintStream allows other output streams to conveniently print data of various formats. This class never throws an IOException, unlike other output streams.
The methods of the DataOutputStream class process data, such as characters, integers, and UTF strings, convert it to bytes, and write it to the stream.
File f = new File (myFileName);
if(f.exists() && f.isFile() && f.canWrite()) {
  try {
    FileOutputStream fostream = 
    new FileOutputStream(f);
    DataOutputStream dostream =
    new DataOutputStream(fostream);
    
    dostream.writeUTF("Some UTF data");
    dostream.close();
    
    fostream.close();
  }
  catch (IOException e) {
  }
}

Supplement

Selecting the link title opens the resource in a new browser window.
View the DataInputStream and DataOutputStream methods.
Consider the code that creates a FileOutputStream object named fostream, and a DataOutputStream object named dostream.
File f = new File (myFileName);
if(f.exists() && f.isFile() && f.canWrite()) {
  try {
    FileOutputStream fostream = 
    new FileOutputStream(f);
    DataOutputStream dostream =
    new DataOutputStream(fostream);
    
    dostream.writeUTF("Some UTF data");
    dostream.close();
    
    fostream.close();
  }
  catch (IOException e) {
  }
}
In doing so, the code writes the DataOutputStream to the FileOutputStream. - fostream.
It passes a string as a parameter to the writeUTF method, which writes it to the output stream.
Finally, it closes the two streams in the correct order. This way, the one that was created last is closed first.
File f = new File (myFileName);
if(f.exists() && f.isFile() && f.canWrite()) {
  try {
    FileOutputStream fostream = 
    new FileOutputStream(f);
    DataOutputStream dostream =
    new DataOutputStream(fostream);
    
    dostream.writeUTF("Some UTF data");
    dostream.close();
    
    fostream.close();
  }
  catch (IOException e) {
  }
}

Low-level streams

When Java reads or writes data, it opens a data stream, reads or writes the information, and closes the stream.


Java uses the stream, reader, and writer classes for streamed data.
Stream classes deal with general data input and output, whereas the reader and writer classes deal specifically with Unicode and Unicode Transformation Format (UTF) string input and output.
Data received from or sent to general I/O devices consists of bytes. However, Java can support higher-level I/O by piecing together bytes to represent other types of data, such as integers, characters, or strings.
For example, a sequence of four bytes can make up an int.
Java uses a hierarchy of classes to deal with different types of data. The InputStream and OutputStream are abstract classes that use low-level I/O streams to read bytes from or send them to I/O devices such as files, network sockets, and pipes.
Low-level streams provide access directly to underlying bytes. High-level streams build upon low-level streams for additional capabilities.

The FilterInputStream and FilterOutputStream classes extend InputStream and OutputStream respectively. They use high-level filter streams to read or write data, such as strings and ints, from byte streams.
All low-level stream classes inherit from either the InputStream or OutputStream abstract classes.

Many stream input classes have a corresponding output class with similar methods. For example, the FileInputStream class, which is the input class for files, has a corresponding output class, FileOutputStream.
The low-level streams that are direct descendants of the InputStream or OutputStream include
  • ByteArrayInputStream and ByteArrayOutputStream
  • FileInputStream and FileOutputStream
  • ObjectInputStream and ObjectOutputStream
  • PipedInputStream and PipedOutputStream
  • SequenceInputStream
ByteArrayInputStream and ByteArrayOutputStream
The ByteArrayInputStream and ByteArrayOutputStream classes read and write arrays of bytes with buffering.
FileInputStream and FileOutputStream
The FileInputStream receives data from a file in byte form. The FileOutputStream outputs the data to a file.
ObjectInputStream and ObjectOutputStream
The ObjectInputStream deserializes primitive data and objects that have been previously serialized using an ObjectOutputStream object.
PipedInputStream and PipedOutputStream
The PipedInputStream and PipedOutputStream classes work with thread communication. They enable you to create and connect two sides of a stream.
SequenceInputStream
The SequenceInputStream class enables you to concatenate other input streams and to read from each of them, in turn.
The corresponding InputStream and OutputStream subclasses have complementary structures and functions, including
  • constructors
  • read and write methods
  • reading and writing arrays
constructors
The FileInputStream and FileOutputStream classes have similar constructors.

The syntax for the constructors is

FileInputStream(String pathname)
FileInputStream(File file)
FileOutputStream(String pathname)
FileOutputStream(File file)
read and write methods
The FileInputStream class uses the read method to read the next byte from a file. The FileOutputStream class uses the write method to write a byte to a file.

The syntax for these methods is

int read () throws IOException
void write (int <b>) throws IOException
reading and writing arrays
The FileInputStream and FileOutputStream classes have complementary read and write methods for reading and writing arrays of bytes.

The syntax for these methods is

int read(byte[] b)
int read(byte[] b, int off, int len)

void write(byte[] b)
void write(byte[] b, int off, int len)
Suppose you have code that reads information on sales from a file and prints it to the standard output. To do this, the code creates a DataInputStream. This class has an InputStream data member, which is inherited from FilterInputStream.
    for (int i = 0; i < descs.length; i ++) {
      myData = new SalesData (descs[i], amounts[i], values[i]) ;
      writeSalesData ( myData ) ;
    }
    out.close() ;


    // Prepare to read it in
    in = new DataInputStream(new FileInputStream(fruitfile)) ;

    for (int i=0; i<6; i++) {
      myData = readSalesData () ;
      System.out.println("You sold " +
      myData.desc + " at $" +
      myData.value + " each. Amount was " + myData.amount);
    }
    in.close() ;
  }
The DataInputStream object wraps a FileInputStream instance. This enables native datatypes to be read in a machine-independent fashion.
You can layer stream objects together to create streams capable of performing very specific I/O functions.

For example, you can extend FilteredInputStream to create custom filters that discriminately read formatted data. Your custom filter can, in turn, be chained to other streams.

The java.io.File class

Programs are required to write and read data to and from external sources - such as files, other programs, or network resources.

The Java Input/Output (I/O) package - java.io - enables Java programs to read and write data in various formats. Text, sound, graphics, and video files can be processed by appropriate classes from the java.io package.
The java.io package contains classes that enable you to access data both sequentially and at random.

Note

In sequential data access, data is read or written in sequence, from the first record to the last. Nonsequential or random - data access involves reading or writing data in a random order.
The Reader and Writer classes, and their various subclasses, are used for sequential data access. These classes input or output data sequentially as ordered streams of bytes.

The RandomAccessFile class and its subclasses are used to input or output data in a file. The bytes do not need to be in ordered sequences, as opposed to a stream.
The java.io.File class represents either a directory or a single file within the file system.It allows you to navigate, describe, and access those files or directories.
The Java security manager allows only specified operations to be performed within a given security context. Because most browsers don't allow any kind of file access, the File class and related I/O classes are usually used in applications instead of applets.
Creating a File object does not necessarily mean that you create a real file or directory. While representing the name of a file, the File object does not represent, or enable you to access, the data in the file.

Similarly, when a File object is deleted by the garbage collector, no physical files are deleted.
Creating a File object does not actually create a file on the local system. It merely encapsulates the specified string in one of a number of constructors:
  • File (File directoryObj, String fileName)
  • File (String pathName)
  • File (String pathName, String fileName)
File (File directoryObj, String fileName)
This constructor creates a new File instance using the pathname from an existing File instance and a string containing the filename.
File (String pathName)
This constructor creates a new File instance using the given pathname string.
File (String pathName, String fileName)
This constructor creates a new File instance using the given pathname string and filename string.
Consider the code that creates a simple file access application in Java. To access a file, you should first import the relevant Java classes – in this case File and RandomAccessFile, which are both part of the java.io package.
import java.io.*;
import java.awt.*;
import java.awt.event.*;
import javax.swing.*;

public class SampleWriteFile implements ActionListener {"
The java.awt , java.awt.event, and javax.swing packages are imported to be able to utilize GUI components.
Once you have imported the relevant java.io classes, you need to instantiate the GUI components to be able to input names. These names are written to a RandomAccessFile named sampletext.txt.
public class SampleWriteFile  implements ActionListener {

  private Frame f;
  private Button write, clear, exit;
  private TextField txt;
  public SampleWriteFile(String s) {
    f=new Frame(s);
    write=new Button("Write to file");  write.addActionListener(this);
    clear=new Button("Clear entries");  clear.addActionListener(this);
    exit=new Button("Exit");  exit.addActionListener(this);
    txt=new TextField(20);  
    Label l=new Label("Enter name");
    Panel p=new Panel();
    Panel p2=new Panel();
    p.add(l);p.add(txt);
    p2.add(write);p2.add(clear);p2.add(exit);
    f.add(p, "North");
    f.add(p2);
    f.pack();
    f.setResizable(false); f.setVisible(true);  
  } 
In the RandomAccessFile instantiation, the rw option is used to be able to read and write data from the file.
public void writeFile() {
       try {
  RandomAccessFile file=new RandomAccessFile("sampletext.txt", "rw");
  file.seek(file.length());
  file.writeBytes(txt.getText()+ "\n");
      }
      catch(IOException e) {
  JOptionPane.showMessageDialog(null,"Cannot write to File","Exception",JOptionPane.ERROR_MESSAGE);
}
The seek method is used to get to a specific location in the file. The value returned by the length method is passed to the seek method, so that we can get to the end of the specified file.
The writeBytes method is used to write data coming from the text field into the file named SampleText.txt.

Supplement

Selecting the link title opens the resource in a new browser window.
View the code for the SampleWriteFile application.
There are 12 methods you can use on a File object. These include
  • exists
  • getName
  • getAbsolutePath
  • isDirectory
  • isFile
  • canRead
exists
You use the exists method to confirm whether a specified file exists. The method returns a value of true if the file exists.
getName
You use the getName method to return the name of a file or directory - the last element of a full pathname.
getAbsolutePath
The getAbsolutePath method returns a String value, which is the full absolute path to a file or directory, whether the file was initially constructed using a relative pathname or not.
isDirectory
The isDirectory method returns a value of true if the string specified in the object's constructor represents a directory instead of a file.
isFile
The isFile method determines whether a File object represents a file or a directory. The method returns a boolean value of true if an abstract filename exists, and is a normal file - that is, the File object does not represent a directory. Otherwise it returns false. The MS Windows implementation of the isFile method has been reworked in JDK1.6. It is now always set to return false for devices such as CON, NUL, AUX, LPT, which makes it consistent with the UNIX implementation of isFile.
canRead
The canRead method determines whether data can be read from a file. It returns a boolean value of true only if the file exists and can be read by the application. Otherwise it returns false.
The remaining six methods are
  • getTotalspace
  • getFreespace
  • getUsablespace
  • setWritable
  • setExecutable
  • canExecute
getTotalspace
The getTotalspace method returns a long value representing the size in bytes of the partition named by the abstract path.
getFreespace
The getFreespace method returns a long value, which is the number of bytes available on the partition named by the abstract path. The value returned is a hint, and not a guarantee that all the bytes are usable. The number of unallocated bytes are most likely accurate after the call to gerFreespace. This method does not guarantee that write operations to the file system are successful.
getUsablespace
The getUsablespace method returns a long value, which is the number of bytes available on the partition named by the abstract path name.
setWritable
The setWritable method allows a particular file to be writeable and takes two parameters. The first parameter is a boolean value. If set to true, the file becomes writable, but if set to false, the file becomes read only. The second parameter is also a boolean value. If set to true, the write permission applies only to the owner or the creator of the file, but if set to false, the write permission applies to everybody.
setExecutable
The setExecutable method sets the execute permission of a file. It also takes two parameters. If the first parameter is set to true, the file is set to allow execute operations. If the second parameter is set to true, the execute permissions apply only to the owner or the creator of the file. If the second parameter is set to false, the execute permission is applied to everybody.
canExecute
The canExecute method returns a boolean value. If true is returned, the file can be executed.
Consider the code that uses the isDirectory method to determine whether an array element - a File instance - is a directory. If it is, the application searches it for a specified file.
class InnerActionListener implements
  ActionListener {
    public void actionPerformed (ActionEvent e) {
      ReportAction r = new ReportAction() ;                  
      r.setPriority(Math.min(r.getPriority() + 1,
            Thread.MAX_PRIORITY));
      r.start() ;
      
      File[] allDrives = File.listRoots();
      for (int i=1 ; i<allDrives.length-1; i++) {
              if (allDrives[i].isDirectory())
        answer.append (search(allDrives[i], "test.txt"));
      }
      r.interrupt() ;
    }
}
Suppose you want to create an instance of a File and use the most common methods associated with a File class. This application searches for files using a method that takes a File object and a search string as parameters. The File object represents the directory being searched.
String search (File f, String fileName) {
  String contents[] = f.list() ;
  int i = 0;
  String found = "Not found" ;

  for (i=0; i<contents.length; i++) {
    if (fileName.equals (contents[i]))
      return (new File(f, contents[i]).getAbsolutePath()) ;
  }
  i = 0 ;
  while (i < contents.length) & (found.equals ("Not found"))) {
    File child = new File (f, contents[i]) ;
    if (child.isDirectory())
      found = search (child, fileName);
    i++ ;
  }    
  return found ;
}
Java uses the File object's list method to return an array of Strings, listing the contents of a directory. If the File does not represent a directory, the list method returns a null value. This will cause the application to throw a NUllPointerException, which can be handled by using a try-catch block.
If one of the files in the directory matches the filename specified by the user, the method returns a string, representing the absolute path to the target file.

Painting Swing components

Painting GUI components

In Java, components are rendered on screen in a process known as painting. Although this is usually handled automatically, there are occasions when you need to trigger repainting, or modify the default painting for a component.


The core painting mechanism is based on the Abstract Windowing Toolkit (AWT). In newer versions of Java, Swing painting mechanisms are based on and extend the functionality of AWT mechanisms.
Components can be heavyweight or lightweight. A heavyweight component has its own native screen peer. For a lightweight component to exist there must be a heavyweight further up the containment hierarchy. So lightweight components are more efficient. Swing components tend to be lightweight.

Painting for lightweight and heavyweight components differs slightly.
Painting is triggered when a GUI element is launched or altered in any way. This can be caused by
  • a system event
  • an application event
a system event
System-triggered painting operations are caused when a system requests a component to be rendered onscreen for the first time, resized, or repaired.

If you open the Save As window in an application, then a system request is triggered.
an application event
Application-triggered painting events occur when the internal state of an application changes and requires components to be updated.

For example, if an item is selected, the application might send a request for the item to be highlighted.
Painting in AWT
When a paint request is triggered, AWT uses a callback mechanism to paint the lightweight and heavyweight components of a GUI.

You should place the code for rendering the component in the relevant overriding paint method of the java.awt.Component class. The method is invoked whenever a system or application request is triggered.
public void paint(Graphics g)
The paint method is not invoked directly. Instead, you call the repaint method to schedule a call to paint correctly.

The Graphics object parameter is pre-configured with the state required to draw and render a component. The Graphic parameter can be reconfigured to customize painting.

public void repaint()
public void repaint(long tm)
public void repaint(int x, int y, int width, int height)
public void repaint(long tm, int x, int y,
  int width, int height)

For complex components, you should specify the region to be rendered using the arguments of the repaint method. The updated region is referred to as the clip rectangle.

The whole component is repainted if no arguments are given.

public void repaint()
public void repaint(long tm)
public void repaint(int x, int y, int width, int height)
public void repaint(long tm, int x, int y,
  int width, int height)

You can use an overridden update method to handle application-triggered painting differently from system-triggered painting.

For application-triggered paint operations, AWT calls the update method. If the component doesn't override the update() method, the default update method paints heavyweight components by clearing the background and calling the paint method.

The process of updating specified areas of a component is known as incremental painting. Incremental painting is not supported by lightweight components.
Consider the code that is used to refresh the applet when a user types text. You first create the ke instance to represent the event of typing a key.

public void keyTyped(keyEvent ke) {
  msg += ke.getKeyChar();
  repaint();
}

You call the ke instance's getKeyChar method to determine the value of the typed key. You assign the value to a variable - msg in this case - using the += overloaded operator.

You then call the repaint method, which in turn calls the overridden paint method. The value of the key typed - msg - is passed to the paint method and the key character is painted onscreen.


Painting in Swing
Painting Swing components is based on the AWT callback method, so it supports the paint and repaint methods. Swing painting also extends the functionality of paint operations with a number of additional features.

The Swing API, RepaintManager, can be used to customize the painting of Swing components. In addition, Swing painting supports Swing structures, such as borders and double-buffering.

Double-buffering is supported by default. Removing double-buffering is not recommended.
Because lightweight components are contained within heavyweight components, the painting of lightweight components is triggered by the paint method of the heavyweight component.
When the paint method is called, it is translated to all lightweight components using the java.awt.Container class's paint method. This causes all defined areas to be repainted.
There are three customized callbacks for Swing components, which factor out a single paint method into three subparts. These are
  • paintComponent()
  • paintBorder()
  • paintChildren()
paintComponent()
You use the paintComponent method to call the UI delegate object's paint method. The paintComponent method passes a copy of the Graphics object to the UI delegate object's paint method. This protects the rest of the paint code from irrevocable changes.

You cannot call the paintComponent method if UI delegate is set to null.
paintBorder()
You use the paintBorder method to paint a component's border.
paintChildren()
You use the paintChildren method to paint a component's child components.
You need to bear several factors in mind when designing a Swing paint operation.

Firstly, application-triggered and system-triggered requests call the paint or repaint method of a Swing component, but never the update method. Also, the paint method is never called directly. You can trigger a future call to it by invoking the repaint method.

As with AWT components, it is good practice to define the clip rectangle using the arguments of the repaint method. Using the clip rectangle to narrow down the area to be painted makes the code more efficient.

You can customize the painting of Swing components using two properties, namely
  • opaque
  • optimizedDrawingEnabled
opaque
You use the opaque property to clear the background of a component and repaint everything contained within the paintComponent method. To do this, opaque must be set to true, which is the default. Setting opaque to true reduces the amount of screen clutter caused by repainting a component's elements.
optimizedDrawingEnabled
The optimizedDrawingEnabled property controls whether components can overlap. The default value of the optimizedDrawingEnabled property is true.
Setting either the opaque or the optimizedDrawingEnabled property to false is not advised unless absolutely necessary, as it causes a large amount of processing.

You use the paintComponent method for Swing component extensions that implement their own paint code. The scope of these component extensions need to be set in the paintComponent method.

The paintComponent method is structured in the same way as the paint method.

// Custom JPanel with overridden paintComponent method
class MyPanel extends JPanel {
 
public MyPanel(LayoutManager layout) {
  super (layout) ;
}
 
public void paintComponent(Graphics g) {
  // Start by clearing the current screen
  g.clearRect( getX(), getY(), getWidth(), getHeight()) ;
  g.setColor (Color.red) ;
  int[] x = {30, 127, 56, 355, 240, 315 } ;
  int[] y = {253, 15, 35, 347, 290, 265} ;
  //Draw complex shape on-screen and fill it
  g.drawPolygon (x, y, 5) ;
  g.fillPolygon (x, y, 5) ;
  }
}

Summary

Painting is the process of rendering components onscreen. Heavyweight components have matching native peers, whereas lightweight components rely on a heavyweight container to do their painting. Painting is triggered by requests. System-triggered requests occur when windows are launched, resized, or repaired. Application-triggered requests occur when the internal state of an application changes.

AWT uses a callback method to invoke an overridden version of the paint method of the java.awt.Component class. You define the area that requires painting, the clip rectangle, using the arguments of the repaint method. You can also override the update method for application-triggered paint operations.

Swing painting is based on AWT painting and then adds further functionality. Heavyweight containers translate the paint method to all the lightweight components contained within them. Swing painting has three customized callbacks and two properties that you use to customize the Swing painting operation.

Coding an event handler

Listeners represent each event they handle with a separate method. And each listener method takes an event parameter of the appropriate type.


For example, the actionPerformed method of the ActionListener interface takes an ActionEvent object as a parameter.
public void actionPerformed (ActionEvent e)
In the code example, the class implements the MouseListener's mouseClicked method, which takes a MouseEvent object as a parameter.
public void mouseClicked (MouseEvent e) {
  String search = frame.t.getText( );
  String searchField = frame.scribble.getText( );
  if ( (search != null) & (search != " ") ) {
    int i = searchField.indexOf (search);
    if (i == -1)
      frame.display.setText("Search string not found");
    else {
      frame.display.setText("Search string found");
      // Highlight the found search string
      frame.scribble.select(i, i + search.length( ) );
    }
  }
}
When you implement a listener interface, you must provide empty implementations for any of its methods that you do not want to use.

Consider the code that provides empty implementations for the four MouseListener methods it doesn't use.
public void mouseClicked (MouseEvent e) {
  String search = frame.t.getText( );
  String searchField = frame.scribble.getText( );
  if ( (search != null) & (search != " ") ) {
    int i = searchField.indexOf (search);
    if (i == -1)
      frame.display.setText("Search string not found");
    else {
      frame.display.setText("Search string found");
      // Highlight the found search string
      frame.scribble.select(i, i + search.length( ) );
    }
  }
}
public void mouseEntered(MouseEvent e) {}
public void mouseExited(MouseEvent e) {}
public void mousePressed(MouseEvent e) {}
public void mouseReleased(MouseEvent e) {}
Java provides an adapter for each interface that has more than one method. For example, the WindowListener interface has a corresponding adapter class that implements it. This is called WindowAdapter.

To handle and perform this kind of event, a WindowEvent must be passed to a WindowListener or WindowAdapter object that is registered to a Window component.

The sample code shows how this is performed:
import javax.swing.*;
import java.awt.*;
import java.awt.event.*;

public class SampleS {
    public static void main(String args[]) {
        JFrame f=new JFrame("Sample JFrame");
        f.setVisible(true);
        f.addWindowListener(new WindowAdapter() {
            public void  windowClosing(WindowEvent e) {
                System.exit(0);
            }
        });
    }
}
The addWindowListener method is used to register a WindowEvent for a Window component such as a JFrame. A windowClosing method is implemented whenever a WindowEvent occurs. This in turn closes the current window as executed by the System.exit(0) statement.
Using the adapter instead of the listener interface to handle an event often prevents you having to implement irrelevant methods that are part of the listener interface.

However, the downside is that by extending adapter classes, you prevent the event handler from extending any other class.

Supplement

Selecting the link title opens the resource in a new browser window.
View a table of listener interfaces and their adapters.
Event adapters and event listeners are commonly implemented using Java's anonymous inner classes. This allows you to register and define the event handling code all in one place and with the minimum of extraneous code.
checkBox.  {
  public void actionPerformed(ActionEvent e) {
    if (checkBox.isSelected())
      label.setText("You will be receiving special deals");
    else
      label.setText("You have chosen not to receive special deals");
  }
}
You can, for example, create an anonymous inner class that implements the ActionListener interface. To do this, you use a listener registration method - in this case, addActionListener - to register the adapter.
checkBox.MISSING CODE {
  public void actionPerformed(ActionEvent e) {
    if (checkBox.isSelected())
      label.setText("You will be receiving special deals");
    else
      label.setText("You have chosen not to receive special deals");
  }
}
component.addXXXListener (new XXXListener() {
  public void eventhandler (eventtype e) {
    // implementation   }
}
checkBox.addActionListener (new ActionListener() {
  public void actionPerformed(ActionEvent e) {
    if (checkBox.isSelected())
      label.setText("You will be receiving special deals");
    else
      label.setText("You have chosen not to receive special deals");
  }
}
You type addActionListener (new ActionListener() to register the adapter.
You have registered the ActionListener anonymous class.

Next, you define the relevant method - in this case, actionPerformed.
checkBox.addActionListener(new ActionListener() {
  public void actionPerformed(ActionEvent e) {
    if (checkBox.isSelected())
      label.setText("You will be receiving special deals");
    else
      label.setText("You have chosen not to receive special deals");
  }
}
Suppose you have a List control and you add a listener to listen for ItemEvents. The listener implements the ItemListener interface, which contains one method only - the itemStateChanged method.
public void itemStateChanged (ItemEvent e)
The itemStateChanged method is invoked when the event occurs, such as when a list item is selected. The details of the event are passed to the event handler - in other words the method - via the ItemEvent argument, AccountList.
public void itemStateChanged(ItemEvent AccountList) {
  try {
    List target = (List) AccountList.getItem() ;
    int i = 0;
    while (i<6 && !(accountOptions[i].equals(target.getText()))) {
          i++;
    }
    if (e.getStateChange() == ItemEvent.DESELECTED) {
      descriptions[i] = description.getText();
    }
    if (e.getStateChange() == ItemEvent.SELECTED) {
      description.setText(details[i]);
    }
  }
}
The target object implements the ItemListener interface and is passed to ItemEvent when the event occurs. The listener is spared the details of processing individual mouse movements and mouse clicks, and instead processes semantic events, such as ItemEvent.DESELECTED or ItemEvent.SELECTED.
public void itemStateChanged(ItemEvent AccountList) {
  try {
    List target = (List) AccountList.getItem() ;
    int i = 0;
    while (i<6 && !(accountOptions[i].equals(target.getText()))) {
          i++;
    }
    if (e.getStateChange() == ItemEvent.DESELECTED) {
      descriptions[i] = description.getText()
    }
    if (e.getStateChange() == ItemEvent.SELECTED) {
      description.setText(details[i]);
    }
  }
}
The getItem method of the AccountList object is cast to a List datatype, which is assigned to target, an object of the List class.
public Object getItem()
The getItem method returns the element of the selectable control - a List in this example - affected by the selection event.
public void itemStateChanged(ItemEvent AccountList) {
  try {
    List target = (List) AccountList.getItem() ;
    int i = 0;
    while (i<6 && !(accountOptions[i].equals(target.getText()))) {
          i++;
    }
    if (e.getStateChange() == ItemEvent.DESELECTED) {
      descriptions[i] = description.getText();
    }
    if (e.getStateChange() == ItemEvent.SELECTED) {
      description.setText(details[i]);
    }
  }
}
You can use the getPoint method in the MouseEvent object to determine an event's x and y coordinates. The returned coordinates are relative to the component's x and y coordinates. You can call getPoint() at any time.

Alternatively, you can call the getX and getY methods separately.
public synchronized Point getPoint()

public int getX()

public int getY()

Implementing an event listener

To code an event handler you need to

  • declare an event handler class
  • register an instance of the class as a listener on an event source
  • include code to implement the methods
You declare an event handler class by implementing a listener interface or by extending a class that does.
Because Java allows multiple interface implementations, it's possible for a single class to implement more than one listener interface. This feature allows you to use the same class to handle different types of events.
In the example, the SearchButton class implements the MouseListener interface, so that it is capable of handling mouse events, such as mousePressed or mouseClicked.
class SearchButton extends Button implements MouseListener {
  Gui3 frame; // Refers to the parent window
  SearchButton(String caption, Gui3 frame) {
    super (caption);
    this.frame = frame;
    addMouseListener(this);
  }
}
Once you have declared the event handler class, you need to register the listener. When listeners are registered on an event source, the Java runtime system automatically invokes the correct method in the listener in response to events, using a method call from the event source.
component.addeventlListener(theListener);
Each component has a set of methods available for registering listeners - one for each event type.

In the code example, the SearchButton class registers itself to listen for mouse events using the addMouseListener method.
class SearchButton extends Button implements MouseListener {
  Gui3 frame; // Refers to the parent window
  SearchButton(String caption, Gui3 frame) {
    super (caption);
    this.frame = frame;
    addMouseListener(this);
  }
}

The AWTEvent class

All events are instances of event classes in the event class hierarchy. All classes in this hierarchy inherit from the java.util.EventObject class, and all classes in the AWT event hierarchy inherit from java.awt.AWTEvent.

The subclasses of AWTEvent can be divided into two groups:
  • low-level events
  • high-level (or semantic) events
low-level events
Low-level events are very specific user actions, such as clicking a button or moving a mouse.
high-level (or semantic) events
High-level, or semantic, events are more generalized or abstract events. They occur when a user chooses, selects, or alters something. High-level events are also known as semantic events because they abstract meaningful actions from sets of lower-level actions.
The ComponentEvent class contains five subclasses representing low-level events. These are
  • InputEvent
  • WindowEvent
  • FocusEvent
  • ContainerEvent
  • PaintEvent
InputEvent
InputEvent is the root event class for all component-level input events. This class has two subclasses - MouseEvent and KeyEvent.

The three types of key events are key pressed, key released, and key typed. Each of these key events has a corresponding method and constant. You can use the getKeyChar method to return the char representing the key that has generated the event. Mouse events occur when a mouse button is pressed or released, or when a mouse is moved. The MouseEvent class also contains the MouseWheelEvent class for mouse wheel rotation.
WindowEvent
Window events occur whenever a window

  • is activated or deactivated
  • is opened, closed, or closing
  • is reduced to an icon or restored to a fully open state
  • gains or loses focus
FocusEvent
The two focus events are focus gained and focus lost. A component gains permanent focus when it makes a successful requestFocus method call or when users click or tab to access it. And it gains temporary focus as a side-effect of another operation, such as a window deactivation or scrollbar drag.

You distinguish between permanent and temporary focus using the isTemporary method of the FocusEvent:

public boolean isTemporary()

The isTemporary method returns true if the focus was temporarily lost.
ContainerEvent
Container events occur when components are added to, or removed from, a container.
The registered container listener receives notification of an event and can obtain the identity of the new component using a getChild method call. This allows containers to easily add input event listeners to, or remove them from, their components as each component is added or removed.
PaintEvent
Paint events are generated by the AWT, not delivered to any listeners. So they are of no practical use to programmers.
The four pre-defined subclasses representing semantic events are
  • ItemEvent
  • AdjustmentEvent
  • TextEvent
  • ActionEvent
ItemEvent
Item events occur in components that have implemented the ItemSelectable interface. They represent the selection or deselection events on selectable items, such as lists, checkboxes, and pop-up menus.

Item events are generated by ItemSelectable objects, for example Checkbox, List, JComboBox, and CheckboxMenuItem. Rather than having to deal with individual mouse or click events, this high-level event is more meaningful and a listener can more easily deal with relevant events.
AdjustmentEvent
Adjustment events occur in components such as scrollbars, which have numeric values that can be incremented or decremented by the user.

For example, as a scrollbar is moved, its new position is signaled to an adjustment listener as an adjustment event.
TextEvent
Text events occur when text is entered, deleted, or edited in text entry fields.
ActionEvent
Action events include such actions as clicking a button or pressing a function key. Several different user actions may result in the same action event being generated, which means that logically-related, higher-level events can be grouped together for handling in one place.

You can use the ActionEvent class's getActionCommand method to distinguish between different types of the same semantic event.
All event types are represented as predefined constants in the different event classes to which they belong. For example, the MouseEvent has constants for MOUSE_CLICKED and MOUSE_RELEASED, whereas for KeyEvent there are such constants as KEY_PRESSED.

You can use the AWTEvent class getID method to return one of these constants and so identify the type of event that has occurred.

Event delegation

It is important to consider how users interact with the user interface when designing a graphical user interface (GUI). The GUI may require users to click, resize, or drag and drop components of the interface, and input data using the keyboard. These actions will result to an event and you need to write a code to handle them.
Event handling code deals with events generated by GUI user interaction. The best practices for coding event handlers are outlined in the event delegation model.
The event delegation model comprises three elements:
  • Event source
  • Event listener
  • Adapter
Event source
An event source is a component, such as a GUI component, that generates an event. The event source can be generated by any type of user interaction. You can also combine a number of different types of events into one event object.

For example, if a user clicks and drags an icon, you can sum up the mouse-clicked event and the mouse-moved event into one event object.

In the event delegation model, a class represents each event type. Event objects are all defined in the java.util.EventObject subclasses.

A generated event object

  • provides the methods to add or remove the source event
  • manages the list of registered event listeners
  • provides the appropriate class type to the registered event listeners
Event listener
Event listeners are objects that receive notification of an event. Components define the events they fire by registering objects called listeners for those event types. When an event is fired, an event object is passed as an argument to the relevant listener object method. The listener object then handles the event.

To receive notification of an event, the object must be registered with the event source. To subscribe to the event source, you implement the appropriate listener interface.

All listeners are implementations of the EventListener interface or one of its subinterfaces. The Java API provides a predefined listener interface for each set of event types that a source can fire. For example, the MouseListener interface deals with mouse events, and the ActionListener interface deals with action events fired by buttons and other components.

Each listener interface provides at least one method for delivering the event object to the listener, in addition to any methods required for the action. All methods take one parameter and are part of the EventObject class.
Adapter
Adapters are abstract classes that implement listener interfaces using predefined methods. These are provided for convenience.

You can use an adapter to apply one listener's methods without having to implement all other methods. Adapters provide empty implementations for all interfaces' methods, so you only need to override the method you are interested in.
SwingWorker class is designed to be used for situations where you need to have a long running task run in a background thread and provide updates to the GUI either when done or while still in progress. Subclasses of SwingWorker must implement the doInBackground method to perform the background computation.
When using the SwingWorker class, you need to subclass SwingWorker and override the doInBackground method and done method. You can code a lengthy operation inside doInBackground and add another task into the done method before updating the Swing component from the event thread.
With the release of Java SE 6.0, additional features for sorting and filtering the JTable have been added. By filtering the contents of a JTable, only the rows that match the user specified constraints are displayed. Users can click on a specific column to be able to sort the contents accordingly.
Sorting is done by associating a JTable with a RowSorter class. RowSorter maintains two mappings. One maps rows in a JTable to the elements of the underlying model and the other let you go back again. Having two mappings allows you to do sorting and filtering. The class is generic enough to work with both TableModel and ListModel. TableRowSorter class is used to work with a JTable.
In the simplest case, you pass the TableModel to the TableRowSorter constructor and then pass the created RowSorter into the setRowSorter method of JTable.

The code shows an example:
           TableModel model = new DefaultTableModel(rows, columns) {
               public Class getColumnClass(int column) {
                   Class returnValue;
                   if ((column >= 0) && (column < getColumnCount())) {
                     returnValue = getValueAt(0, column).getClass();
                   } else {
                       returnValue = Object.class;
                   }
                   return returnValue;
             }
           };

           JTable table = new JTable(model);
           RowSorter<TableModel> sorter =new TableRowSorter<TableModel>(model);
           table.setRowSorter(sorter);
           JScrollPane pane = new JScrollPane(table);
           frame.add(pane, BorderLayout.CENTER);
           frame.setBounds(400, 350, 300, 225);
     frame.setResizable(false);   
           frame.setVisible(true);
       
     }
}
To perform filtering on a JTable, a RowFilter needs to be associated with the TableRowSorter and use it to filter the contents of a table using the include method.

The syntax for the include method is:
boolean include(RowFilter.Entry<? extends M,? extends I> entry)
For each entry in the model associated with the RowSorter, the method indicates whether the specified entry should be shown in the current view of the model. In many cases, you don't need to create your own RowFilter implementation.
In the given example, we use the regexFilter() method which uses a regular expression for filtering.
import javax.swing.*;
import javax.swing.table.*;
import java.awt.*;
import java.awt.event.*;
import java.util.regex.*;

   public class SampleFilterJTable {
     public static void main(String args[]) {
           JFrame frame = new JFrame("Sorting JTable");
           frame.setDefaultCloseOperation(JFrame.EXIT_ON_CLOSE);
           Object rows[][] = {
             {"CLSRE", "Callinsure", 388.44},
                    {"INTRSW", "Inter-Swift", 12.56},
                    {"BRCD", "Brocadero", 57.13},
                    {"MIMPS", "Med-Imps", 32.52},
                    {"CBCO", "Custom Boat Co.", 443.26},
                    {"SETLS",  "Sharp-End Tools", 12.90},
                     {"PHLX", "Phlogistix", 31.25},
               {"MTLD", "Mathemetric Ltd.", 45.89}
           };
           Object columns[] = {"Symbol", "Name", "Price"};
           TableModel model =
              new DefaultTableModel(rows, columns) {
             public Class getColumnClass(int column) {
               Class returnValue;
               if ((column >= 0) && (column < getColumnCount())) {